The simplest method to get client certificates
Suppose you are a newbie, and you have created your account at CAcert. You have also passed the CAcert's PING test to your primary email address. You have answered the confirmation email message containing the verification link and this sentence: "Once your account is verified you will be able to start issuing certificates till your hearts' content!". And you have clicked that link.
A little digression from the topic:
Delivery of PING test message required its unsecured transfer from the CAcert server to your mail server (now see the following green note). However, more and more e-mail servers now require secured transfers, frequently by using TLS protocol, which needs mail server to have confidence in CAcert to accept the message. Unfortunately, such a trust is almost always missing, as the receiving server usually have no CAcert root certificate installed, and that's why the message is not transferred. If that receiving server belongs to you or you can do an agreement with its administrator, these root certificates can be installed or, exceptionally, the TLS encryption request may be turned off for a while.
The problem occurs when using a public mail server (gmail.com etc.), for which you cannot want such an intervention. Then you need to agree with the administrator of a company, friendly to you, to take mail for your domain for a short time, allocate an e-mail address to your domain and receive messages addressed to you without TLS security or CAcert certificate installation. At the same time, you need to add an MX record to your DNS domain referencing that company's email server. If your domain has a TXT record with SPF definition, you also need to update it properly. For details see How the Ping Test Works.
In February 2019, CAcert installed the secure transfer protocol TLS 1.2 used also for Ping email. This protocol allows to establish an encrypted connection for message transfers following the SMTP protocol. An encrypted connection can be successfully built, as long as the receiver's mail server also supports TLS 1.2 protocol (RFC 5246, all public mail servers nowadays). TLS 1.2 has less strict requiremens to peers as the previous versions of TLS protocol. So the Ping email passes, although the recipient's server refuses unsecured connections. Moreover, there is no need of strict check of the "well known" CA's roots on both sides of the transfer. So, only the changes of your domain's DNS records remain. |
Do you need your client certificate?
Surely you do. You can perform many actions with it: sign/encrypt your e-mail messages, login to your account, visit CAcert's websites and CAcert secured websites, ...
![]() For MacOS, please read this article.
For MacOS, please read this article. ![]()
As of May 2023, no browser will generate a certificate signing request (CSR) for security reasons. CAcert has therefore developed a new web application Client Certificate Generator that works best on the most commonly used browsers (Firefox, Chrome, Opera, IE, Safari, Edge, ...) and guides you through the whole process. Unlike the previous procedure, at the end a file of type PKCS#12 with the extension .p12 or .pfx will be created, which contains:
- the issued certificate containing the public key,
- the corresponding private key encrypted with the password you set when creating the file,
- the root certificates of the full certificate path; in the case of CAcert, this is the Class 3 Root certificate (intermediate) and the Class 1 Root certificate (CA master root).
Thus, one file contains all the certificates needed to use CAcert and other services. It also eliminates the search for a private key when moving certificates to another computer, certificate renewal, etc. The PKCS#12 file type also serves as an ideal certificate backup.
Important:
In order to download and install CAcert root certificates for the first time, you must use the link http://www.cacert.org/index.php?id=3 (NOT https!) There is a similar problem to the one outlined in the "Little digression" above. In addition, many web browsers now have an "HTTPS-only" mode in which they will not allow any contact with any site other than via the "https" protocol, so you cannot contact sites in this mode other than those whose certificate authority (CA) root certificates are already pre-installed in the browser (and CAcert is not one of those CAs yet).
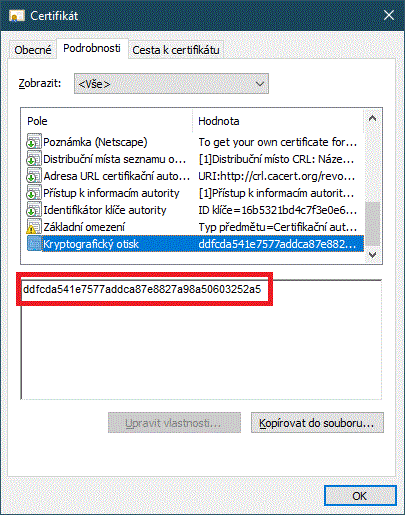
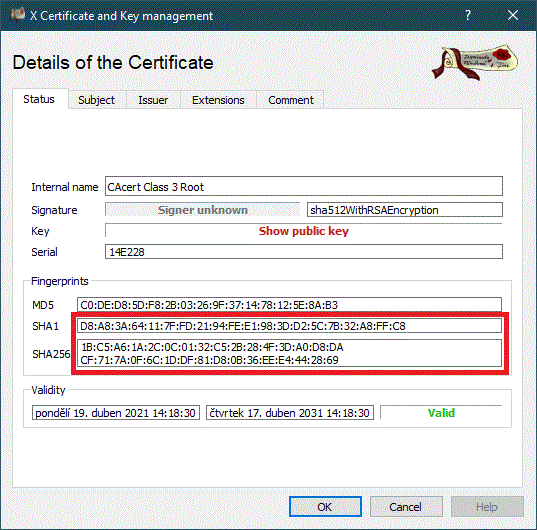
By installing CAcert root certificates, you are also expressing your trust in this CA of your choice. When trusting the CAcert website, feel free to use the http: protocol, as the cryptographic fingerprints of the root certificates are published on the CAcert website for inspection, which is a much better security method than using https. You can check the cryptographic fingerprints by viewing the root certificate details - in Windows (root_X0F):

and in XCA (class3_X14E228):

with fingerprints published on the CAcert website (http://www.cacert.org/index.php?id=3).<<BR>> For more details about installing root certificates, see this Wiki article.
Generating a client certificate using the web application
For a detailed description of the web application, see here. The application itself is available from the CAcert portal or from the Wiki - Frequently Asked Questions (FAQ/CZ), Certificate Problems, or directly.
After entering your username and selecting a key strength, the application will generate a CSR request and a private key (which is not transferred anywhere outside your computer). Press the button to copy the CSR to the clipboard. It is important to know that you will now "bounce" to the CAcert website on the next browser tab, and after the certificate is generated, you must return to the web application, which will build the PKCS#12 file!
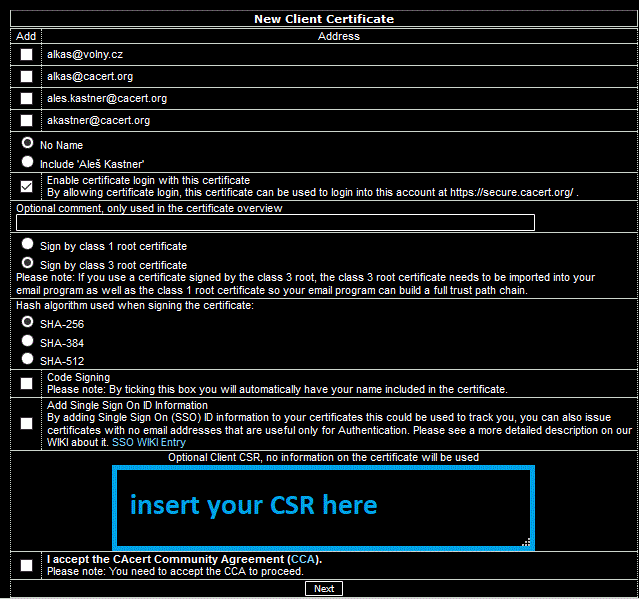
Log in to the CAcert website with your username (i.e. your primary email address) and password. Select "Client Certificates -> New" from the menu. The "New Client Certificate" page will appear.

Don't forget to add your email address/addresses (mark a checkbox/checkboxes) or your name and confirm that you "Accept the CAcert Community Agreement" (CCA, the checkbox below). From the clipboard, paste (Ctrl-V) the generated CSR request. Then press "Next."
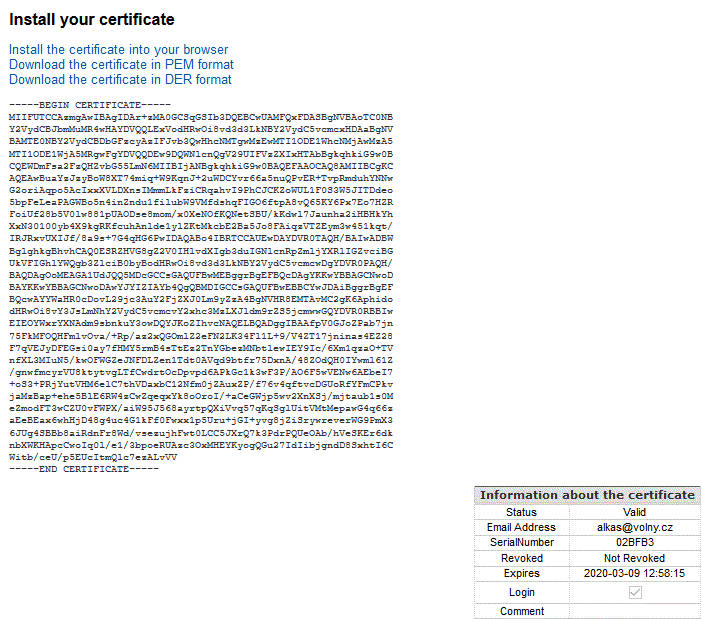
The page with the generated certificate will soon appear. Select the whole of the certificate, from the first line -----BEGIN CERTIFICATE----- to the last -----END CERTIFICATE----- inclusive, and copy it to the clipboard (Ctrl-C).

Return to the web application tab and paste the certificate into the text box (Ctrl-V). The application will now ask for the password to encrypt the private key, build a PKCS#12 (.p12 or .pfx) file and offer you to download it. After naming the file and saving it to your computer, you can exit the web application or log out of the CAcert website.
Installing a certificate from a PKCS#12 file
Probably the easiest way in Windows is to "run" the .p12 file by double-clicking, then entering the private key password and confirming. Unix, Linux, macOS, and other systems can parse the file in their certificate managers and save parts of it as needed for them.
Alternative method when you have already generated the key pair and certificate request (CSR)
(This method is not suitable for beginners. However, some systems/programs, such as Linux/Apache, require separate files for the certificate and private key, for example with .crt and .key extensions.)
If you have generated the private key and CSR request with an utility (XCA, OpenSSL, Cleopatra) and have them stored in files, do the following:
Login to the CAcert Web of Trust with your username/password. Go to "Client certificates -> New" in the CAcert website menu. The "New Client Certificate" page will appear.

Don't forget to add your email address/addresses (in a checkbox/es), possibly add your name and confirm that you "Accept the CAcert Community Agreement" (CCA, the checkbox below). From the generated CSR application file, copy the entire contents (Ctrl-A, Ctrl-C) and paste (Ctrl-V) into the text box as shown. Then press "Next".
After a moment, the page with the generated certificate will appear. You can see its contents encoded as Base64 text and information about it. At the top of the page there are three links to download and install it.

The simplest thing you can do is to use the install link. Or you can save your new client cert as a file and then install it into the browser via its Certificate Manager:
Firefox - certificate manager: "tl. 3 horizontal bars (hamburger) in the upper right corner of the window -> Settings -> Privacy & Security (left) -> scroll down to the button View Certificates -> Personal tab -> Import...";
Edge - icon"..." in the top right -> Settings -> Privacy, Search & Services (left) -> scroll (on the right) to "Security", below it is the link to "Certificate Manager";
Chrome - the icon "3 dots below each other" top right -> Privacy & Security (left) -> Security (right) -> scroll down to "Certificate Manager" link;
Opera - Opera icon in the top left corner of the window -> Settings -> Privacy & Security (left) -> Security -> Certificate Manager;
Vivaldi - Vivaldi icon in the top left corner -> Settings -> Dialog, scroll to Privacy and Security on the left -> scroll to "Certificate Manager" on the right.
The last 4 browsers lead to the system dialog for managing personal certificates in Windows. Here you can view certificates and see if they have the appropriate private keys stored on this computer, import, export, specify their purpose, or delete them.
The certificate is created, installed and valid
Then you should be able to see our Wiki with HTTPS, and what is even more important, to sign & encrypt your e-mail messages, or login to your CAcert account with your brand new client certificate.
Finally, an important warning:
The Firefox browser saves all certificates into its own repository.
Thus, if you want to install both CAcert roots and your client certificates into another repository (e.g. that of an operating system needs - as Windows), you have to install root certificates there from "backup" (i.e. import from a .p12 file) of your client certificates. You can anytime reexport them from the Cert Manager of Firefox, see above and use "Export..." in the end (sometimes explicit consent is required at the time of import for re-export possibility). The file exported will contain your certificate and your private key. Thus, Cert Manager will ask you for a password (enter twice), which you will have to unlock the file with, if you will import the certificate later. You will possibly need to import it both into an operating system and into other browsers, if you prefer some other than the Firefox.
In Firefox, simply installing the Class 1 Root CA certificate is not enough, you must also confirm that you trust it. Select the root certificate under the Authorities tab (Root CA, CA Cert Signing Authority) and press the button "Trust edit" at the bottom to open a dialog where you should mark trust for all purposes.
The Firefox browser have though its own certificate repository, but you can set them to read CA root and intermediate certificates from the Windows system certificate repository. You can find that setting on their configuration page about:config as security.enterprise_roots.enabled and swap it from false to true.
Articles about getting a client certificates
All the wiki contents are available via both HTTP and HTTPS !
Frequently Asked Questions (Issues, Tutorials, Error solving - do not miss!)
Procedures for client certificates:
Windows:
How to create a client certificate in Windows (including PKCS12 backup) with the XCA utility
How to create a client certificate in Windows (including PKCS12 backup) with MMC Certificates module
Unix-Linux:
CSR (Certificate Signing Request)
